- Home
- General Usage
- DCX Controls
- DCX Features
- About DCX
|
| XPopup |
This extension lets you build nice stylish popup menus to be used everywhere in your script including coloring mIRC's own popup menus.
|
| Special Menus |
There are two special reserved menu names in XPopup. They are for mIRC's regular popup menus mirc (channel, statusbar, query and nicklist) and mIRC's menubar popup menu mircbar (the menubar). Their appearance can be changed by XPopup and activated with the following command:
| Syntax: |
/mpopup [mirc|mircbar] [ENABLED] |
| Example: |
/mpopup mirc 1 |
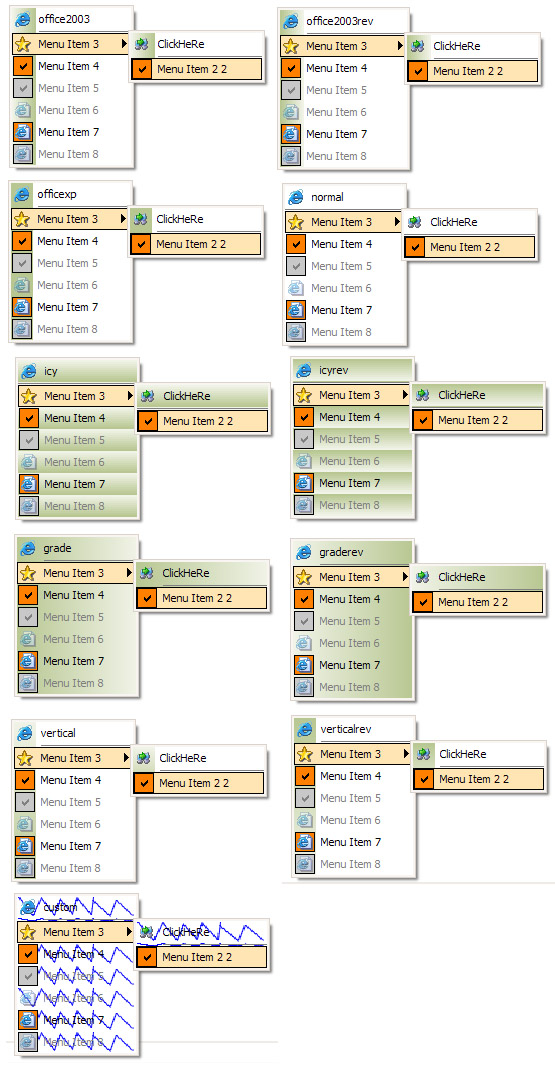
Both menus can have their style, colors and icons modified using the /xpopup command. The command switches -c/-d are disabled for these menus. You cant use /xpop to modify these menus either. To add icons the mIRCs popups menus (status, menubar, channel, query and nicklist) you need to add the icons the menu image lists using /xpopup -i/-j. The icon index number needs to be inserted in the mIRC popup menu syntax like this:
Remember that the same mIRC popup rules still apply. It is only the menu item text syntax that needs to be shaped for XPopup to interpret it correctly. If the [VTAB] element is not present, XPopup assumes that the item text is a regular item (no icon element).
You can also add $idents in your menu item text like mIRC has always permitted to create your own tri-state check system for example with the use of custom icons.
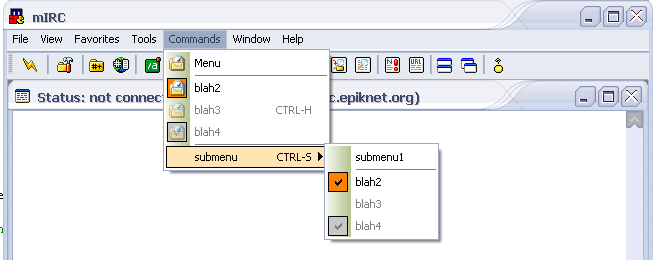
The image below is an example of a mIRC menubar popup menu skinned with XPopup which includes icons.
|
| XPopup Item Path |
The XPopup menus have an engine that parses the given item "path" data to know where to insert/delete/modify a given item in the menu structure. The parameters you supply are a space separated numerical token list of the menu submenus that lead to the menu item position:
| Format: |
N N N ... N |
| Example: |
2 3 |
This position represents the 3rd menu item of the of the second menu item submenu as shown by the selected item in the picture below:
Note:
- If you specify a path that does not exist, parsing halts and an error is displayed.
- You can use 0 for the last value when inserting a menu item to insert it at the end of the menu.
|
| XPopup Events |
Events are sent through mIRCs "ON SIGNAL" event with the signal name being xpopup-[MENU] where [MENU] is the menu name that sent the event. The $1 parameter is the supplied [ID] of the menu item. This is why it's important that this number be unique for all menu items. A returned value of 0 means no selection was made in the menu.
An example of the XPopup signal handler code is shown below:
ON *:SIGNAL:Xpopup-*: {
        ;// get the menu name from Xpopup-[MENUNAME]
        var %m $gettok($signal, 2-, 45)

        ;// nothing clicked
        if ($1 == 0) {
                return
        }

        if (%m == menu_open) {
                if ($1 == 1) { echo -a command 1 }
                else if ($1 == 2) { echo -a command 2 }
        }
        else if (%m == menu_help) {
                if ($1 == 1) { url http://dcx.scriptsdb.org }
                else if ($1 == 2) { echo -a command aboutbox }
        }
        else {
                echo -a unknown menu
        }
}
|
| /xpopup Command |
| The /xpopup command is used to create/modify/destroy an XPopup menu. |
| $xpopup() Properties |
| The $xpopup identifier is a given mIRC alias that communicates with the XPopup DLL to extract information from XPopup menus. |
| /xpop Command |
| The /xpop command is used to add/modify/remove menu items in XPopup menus. |
|
/xpop -a |
| This command lets you add a menu item. |
| Syntax: |
/xpop -a [MENU] [PATH] [TAB] [+FLAGS] [ID] [ICON] (TEXT) |
| Example: |
/xpop -a mymenu 2 1 $chr(9) + 1 1 Menu Item 1 |
| Parameters: |
| +FLAGS |
Menu item flags. |
| c |
Item is checked. |
| g |
Item is disabled/grayed. |
| s |
An empty submenu is created for the item ready for menu items. |
| ID |
Menu item ID as returned on the event handler. |
| ICON |
Menu item icon index. (Use 0 for no icon) |
| TEXT |
Menu item text. It can contain mIRC $identifiers that will be evaluated the first time the menu is being displayed. |
| | Note.- If the item text is meant to be dynamic, you will need to reset the text using /xpop -t
- ID must be unique.
- A menu item that has a checkmark AND an icon, it displays the icon instead of the checkmark.
- Remember to use mIRCs $eval($idents, 0) or $!idents to prevent the mIRC evaluation of the $idents that your text contains.
|
|
/xpop -c |
| This command lets you create a submenu on a menu item. |
| Syntax: |
/xpop -c [MENU] [PATH] |
| Example: |
/xpop -c mymenu 2 1 |
| | | Note. If the item already has a submenu, it is destroyed. This can be used to clear a submenu instead of deleting the whole menu item. |
|
/xpop -d |
| This command lets you destroy a submenu on a menu item. |
| Syntax: |
/xpop -d [MENU] [PATH] |
| Example: |
/xpop -d mymenu 2 1 |
|
/xpop -f |
| This command lets you delete a menu item. |
| Syntax: |
/xpop -f [MENU] [PATH] |
| Example: |
/xpop -f mymenu 2 1 |
|
/xpop -i |
| This command lets you change the icon on a menu item. |
| Syntax: |
/xpop -i [MENU] [PATH] [TAB] [ICON] |
| Example: |
/xpop -i mymenu 2 1 $chr(9) 3 |
|
/xpop -s |
| This command lets you change the state flags on an item (see /xpop -a for the switches) |
| Syntax: |
/xpop -s [MENU] [PATH] [TAB] [+FLAGS] |
| Example: |
/xpop -s mymenu 2 1 $chr(9) +cg |
|
/xpop -t |
| This command lets you change a menu item text. |
| Syntax: |
/xpop -t [MENU] [PATH] [TAB] [TEXT] |
| Example: |
/xpop -t mymenu 2 1 $chr(9) $eval($me, 0) |
| | | Note. Remember to use mIRCs $eval(expression,0) to prevent the mIRC evaluation of the $idents that your text contains. |
| $xpop Identifier |
| The $xpop identifier is a given mIRC alias that communicates with the XPopup DLL to extract information in XPopup menu items. |
|
$xpop().enabled |
| This property retrieves if a menu item is enabled or disabled. |
| Syntax: |
$xpop(MENU, PATH).enabled |
| Example: |
$xpop(mymenu, 2 5).enabled |
|
$xpop().icon |
| This property retrieves the menu item icon index number. |
| Syntax: |
$xpop(MENU, PATH).icon |
| Example: |
$xpop(mymenu, 2 5).icon |
|
$xpop().num |
| This property retrieves the number of menu items in a submenu. |
| Syntax: |
$xpop(MENU, PATH).num |
| Example: |
$xpop(mymenu, 2 5).num |
| | | Note. PATH can be root to find the number of items on the root menu. |
|
$xpop().submenu |
| This property retrieves if a menu item has a submenu or not. |
| Syntax: |
$xpop(MENU, PATH).submenu |
| Example: |
$xpop(mymenu, 2 5).submenu |
|
$xpop().text |
| This property retrieves the menu item text. |
| Syntax: |
$xpop(MENU, PATH).text |
| Example: |
$xpop(mymenu, 2 5).text |
| DCXML for XPopup |
DCXML also allows users to create menus. The syntax and format is similar to the XML used for creating dialogs, but simpler.
| Format: |
/dcxml -p [MENUNAME] [DATASET] [FILENAME] |
| Example: |
/dcxml -p menuName LagBarMenu $qt($mircdir $+ dc.xml) |
In the given example, a menu named menuName will be created from the dataset specified by the name LagBarMenu.
An example of the DCXML format without XPopup support is given below:
	<dcxml>
		<dialogs>
			...
		</dialogs>
	</dcxml>
DCXML support for XPopup is similar, as shown below:
	<dcxml>
		<dialogs>
			...
		</dialogs>

		<popups>
			<popup name="LagBarMenu">
				...
			</popup>

			<popup name="ToolbarDropdownMenu">
				...
			</popup>

			<popup name="PreferencesMenu">
				...
			</popup>
		</popups>
	</dcxml>
Global styles can be used to allow for a consistant look and feel for your menus. However, a style specified in a popup tag will override global style.
	<dcxml>
		<popups>
			<styles>
				<all style="vertical" />
			</styles>

			<popup name="LagBarMenu">
				...
			</popup>

			<popup name="ToolbarDropdownMenu">
				...
			</popup>
		</popups>
	</dcxml>
It is now much easier to add items (and submenus) to your menu.
	<dcxml>
		<popups>
			<popup name="LagBarMenu">
				<item id="1" caption="Check lag" />
				<item caption="-" />
				<item caption="Lagbar styles">
					<item id="3" caption="Line" />
					<item id="4" caption="Bars" />
				</item>
				<item caption="This item does nothing and has no icon" />
			</popup>
		</popups>
	</dcxml>
And lastly, icon support. The same rules apply from /xpopup -i.
	<dcxml>
		<popups>
			<popup name="LagBarMenu">
				<icons>
					<icon index="1" src="$mircdir $+ popup_icons.icl" />
					<icon index="3" src="$mircdir $+ popup_icons.icl" />
					<icon index="5" src="$mircdir $+ popup_icons.icl" />
				</icons>

				<item id="1" icon="1" caption="Check lag" />
				<item caption="-" />
				<item caption="Lagbar styles">
					<item id="3" icon="2" caption="Line" />
					<item id="4" icon="3" caption="Bars" />
				</item>
				<item caption="This item does nothing and has no icon" />
			</popup>
		</popups>
	</dcxml>
Below is a list of attributes and which tag they apply to.
Note: All attributes which apply to the popup tag will also apply to the global all tag.
| style |
|---|
| Applies to: |
<popup> |
| Description: |
The XPopup style. |
| Default value: |
office2003 |
| Valid values: |
See /xpopup -c for a complete listing of styles. |
| Example: |
<popup style="grade"> |
| bgcolour, iconcolour, cbcolour, discbcolour, disselcolour, distextcolour, selcolour, selbordercolour, seperatorcolour, textcolour &/or seltextcolour |
|---|
| Applies to: |
<popup> |
| Description: |
Sets a specific color for the menu. |
| Default value: |
Not applicable. |
| Valid values: |
A numerical long value or mIRC formatted $rgb(R, G, B). See /xpopup -p for more details. |
| Example: |
<popup bgcolour="$rgb(0, 0, 255)" textcolour="255" seperatorcolour="$rgb(0, 255, 0)"> |
| background |
|---|
| Applies to: |
<popup> |
| Description: |
Sets the background for a menu with the custom style. |
| Default value: |
Nothing. |
| Valid values: |
A full path to the image. See /xpopup -b for more details. |
| Example: |
<popup background="$mircdir $+ gfx\menu_bg.png"> |
| flags |
|---|
| Applies to: |
<icon> |
| Description: |
Options to load the icon with. |
| Default value: |
Not applicable. |
| Valid values: |
See /xpopup -i for more details. |
| Example: |
<icon flags="+g" /> |
| index |
|---|
| Applies to: |
<icon> |
| Description: |
The icon index in the file specified. |
| Default value: |
Not applicable. |
| Valid values: |
An integer. See /xpopup -i for more details.
The only difference is that you can load multiple icons by seperating the indexes with commas.
|
| Example: |
<icon index="1,3,4" /> |
| src |
|---|
| Applies to: |
<icon> |
| Description: |
The icon file. |
| Default value: |
Not applicable. |
| Valid values: |
A full path to the icon. See /xpopup -i for more details. |
| Example: |
<icon index="2" src="$mircdir $+ gfx\menu_icons.icl" /> |
| caption |
|---|
| Applies to: |
<item> |
| Description: |
The menu item text. |
| Default value: |
Not applicable. |
| Valid values: |
Any label. If the label is -, then the item is a seperator. |
| Example: |
<item caption="Menu Item Text" />
<item caption="-" /> |
| id |
|---|
| Applies to: |
<item> |
| Description: |
The menu item ID. |
| Default value: |
0 |
| Valid values: |
A positive integer. |
| Example: |
<item id="13" caption="Menu Item Text" /> |
| icon |
|---|
| Applies to: |
<item> |
| Description: |
The icon to use for the menu item. |
| Default value: |
-1 |
| Valid values: |
An index which corresponds to an icon loaded with <icon>. |
| Example: |
<item icon="5" caption="Menu with Icon" /> |
| state |
|---|
| Applies to: |
<item> |
| Description: |
The menu item states, such as checked or grayed. |
| Default value: |
None. |
| Valid values: |
See /xpop -a for more details. |
| Example: |
<item state="+c" /> |
|
|